Loops
Loops repeat blocks of code. They will repeat a block of code until a condition is met or true.
Things that will be covered:
- while loops
- for loops
- Nested loops
- Assignment operators for more concise code
While Loops
Using a loop will let us iterate over values and repeatedly run a block of code
Example: a while loop
let x = 1;
while (x <= 100) {
console.log("Count = " + x);
x = x + 1;
}
Parts of a while loop
- When to start: Code that sets up the loop - like defining the starting value
- When to stop: The condition that defines when a loop should stop or continue
- How to get to the next item: The incrementing or decrementing steps - x = x * 3 or x = x - 1
Running an endless loop that cannot end may cause a browser or tab to crash or become unresponsive. To resolve this, the browser may need to be closed or a popup may ask if you want to kill the script or webpage
for Loops
It may be easy to forget some of the pieces of a loop with a while loop causing an infinite loop crashing the browser. for loops gives more control over the looping process.
Unlike while loops, for loops requiring adding the 3 parts of the loop; Start, Stop and step
Example:
for (var i = 0; i < 6; i++) {
console.log(i)
}
Note: In this example, "i++" is another way of writing "i=i+1"
Writing out how the for loop runs can help debug why a loop may not behaving as expected:
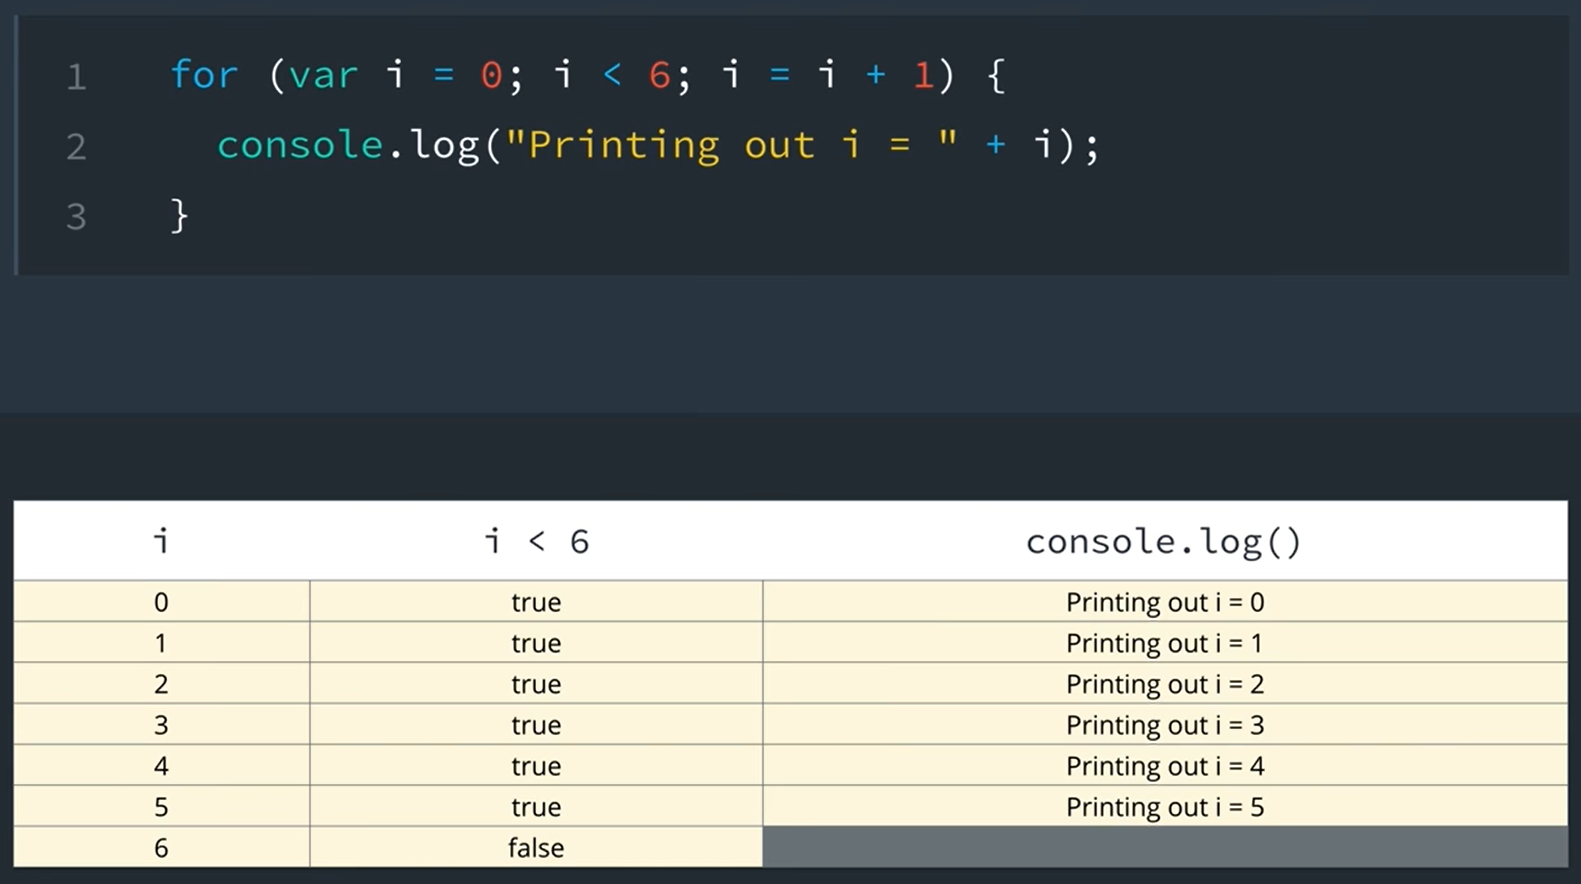
Breaking down the for loop:
for (start; stop; step) {}
for (var = i; i < 6; i++)
- var = 1; - defines the variable and where the "count" will begin in the loop
- i < 6; - defines when the loops will stop. When this case, it will stop when i is no longer less than 6
-
i++ - defines the step or incrementing/decrementing value in the loop
We can increment/decrement by different values other than 1:
i = i * 2, i = i - 3 or i = i + 5
Nested for loops
For loops can be nested inside each other.
            for (var x = 0; x < 3; x = x + 1) {
                for (var y = 0; y < 2; y = y + 1){
                    console.log ("x = " + x + "y = " + y);
                }
            }
Nested loops don't add anything new; Just another layer of complexity.
With a nested loop, the first loop will be "on hold" so to speak until the child loop completes. Then it will continue to the next step in the parent loop... and so on until booth the parent and the nested child loops stop conditions have been met.

operators
- Postfix Operator: x++ - Returns the value of x then increments the value by 1.
- Prefix Operator: ++x - increments the value by 1 before returning the value of x.
x-- or --x does essentially the same thing as ++ but subtracts by 1.
We can also increment/decrement with shorthand for multiplication or divison:
var x = 10; //sets a value of 10 to the variable x.
x *= 5; //This multiples x by 5. The long way of writing this out would be: x = x * 5;
x /= 2; //This divides x by 2. The long way of writing this out would be: x = x / 2;
This shorthand could be useful to save time when writing longer programs.
Functions
Functions are blocks of code that may be reused without typing the same block of code.
Declaring Functions
Functions often take parameters. The parameter is listed as a variable after the function name in parenthases.
If there are multiple parameters, they are seperated with a comma:
function funcName(param1, param2){//code goes here...}
A function may have no parameters: function funcName(){//code goes here...}
This may be used for a process that needs to be repeted with the same expected result each time the function is ran.
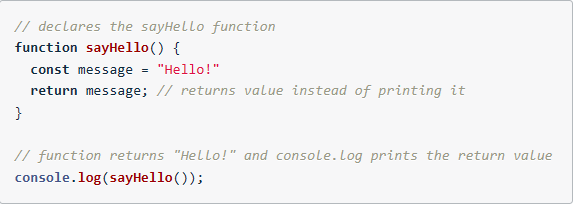
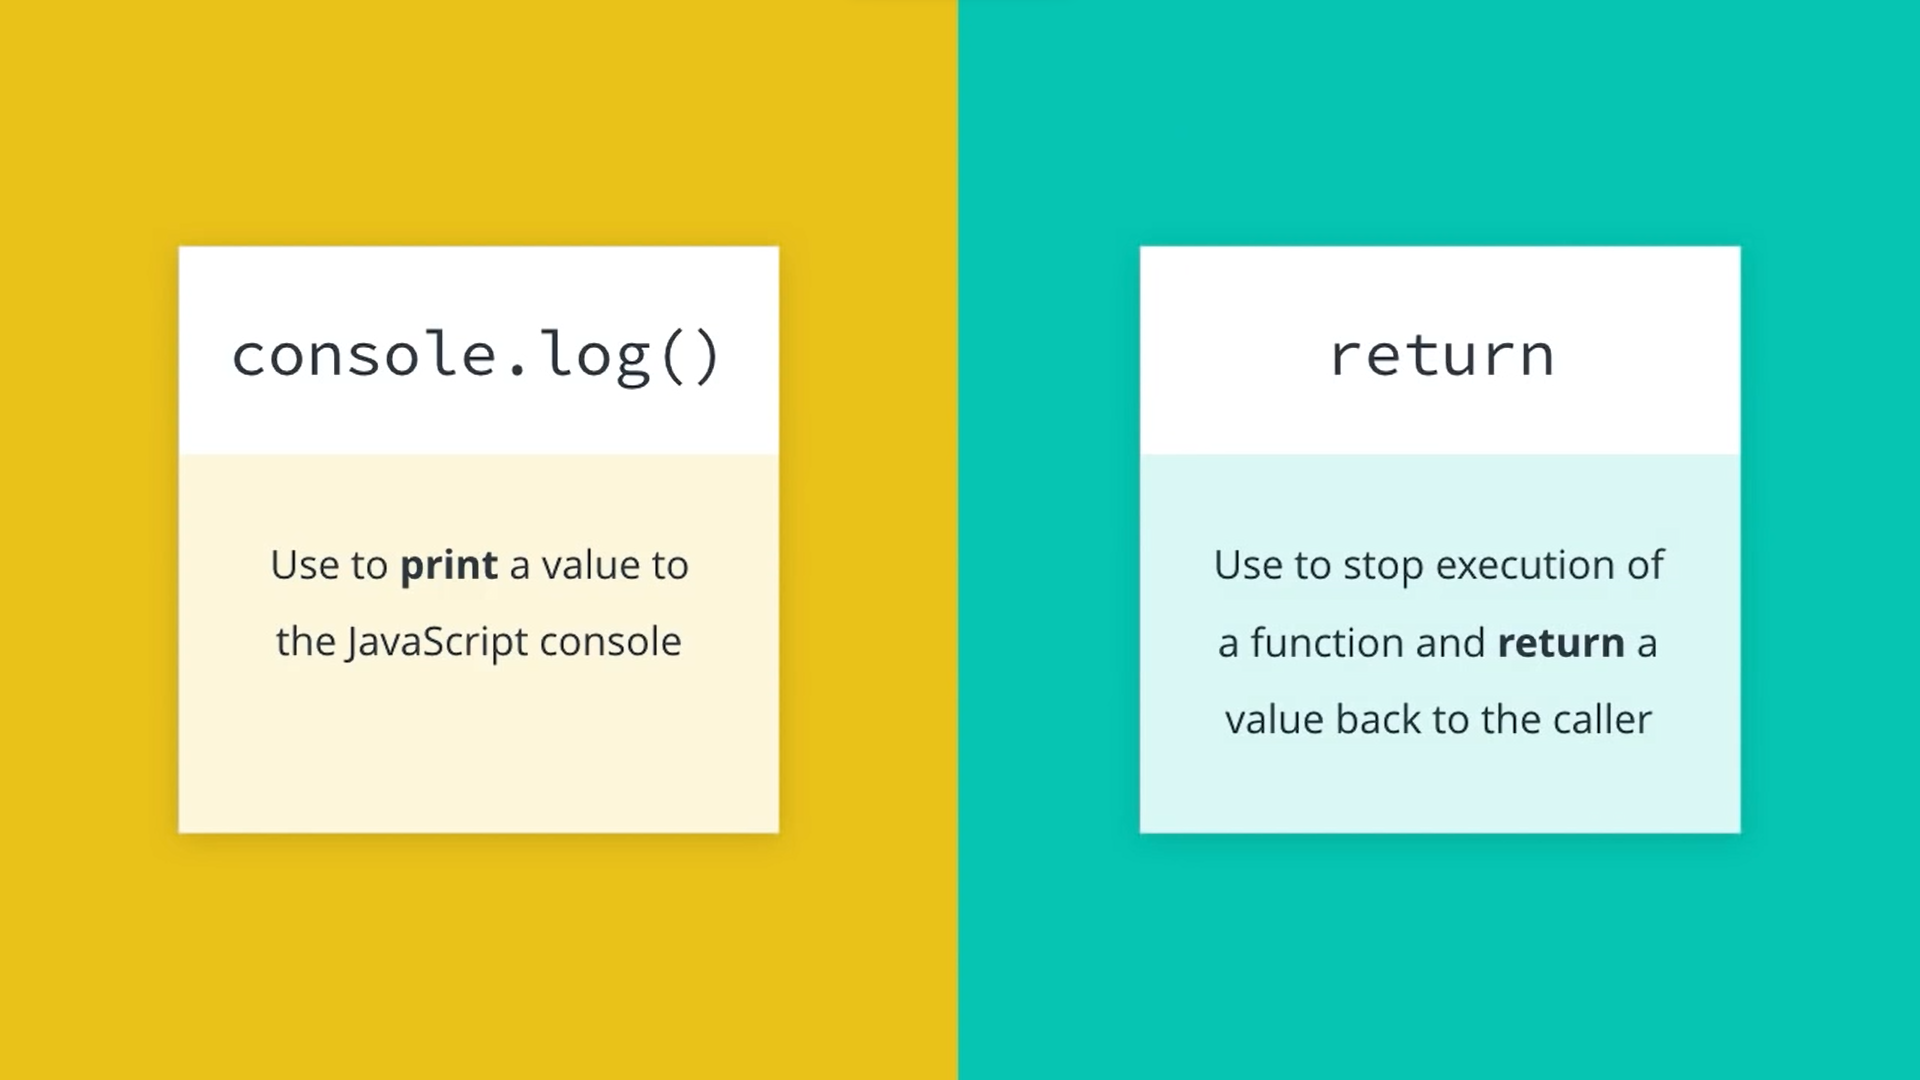
Return Statemenets
Printed value vs returned value:
Printed:
function sayHello() {
--const message = "Hello!";
--console.log(sayHello);
}
Returned:
function sayHello(){
--const message = "Hello!";
--return message;
}
With a return, the value from the function may be used elsewhere in the code. Simply printing or executing the function without returning the value will not allow this to be reused.
How to run a function
Now, to get your function to do something, you have to invoke or call the function using the function name, followed by parentheses with any arguments that are passed into it.
Parameters vs Arguments
The key difference is where a parameter or argument shows up in code. A parameter is always going to be a variable name and appears in the function declaration. A argument is always going to be a value (any JS data types; number, string, boolean, etc...) and will always appear in the code when a function is called or invoked.
Function Recap
- Funcitons package up code so you can easily use (and reuse) a block of code.
- Parameters are variables that store data that's passed into a function for the function to use.
- Arguments are the actual data that's passed into a function when it's invoked/called.
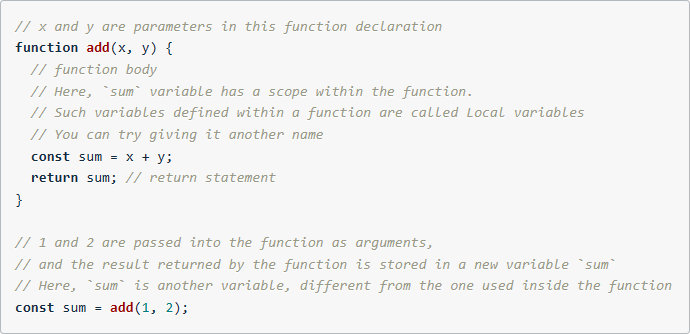
The function body is enclosed inside curly brackets.
Return statments explicitly make your funtion return a value.
To have a function run, you invoke or call the function.
Return Values
undefined: A function always returns a value back to the caller. If a return value is not specified, then the function will return undefined.
console.log("This is an example"); will return undefined because nothing is being returned.
Note: if a condition is met with a return declared in a loop, the loop will break and return the value right away.
Using return values
A function's return value can be stored in a variable or reused throghout the program as a function argument.

Global and Function Scope
JavaScript has three types of scope
- global scope
- function scope
- block scope
global scope variables are accessible to any other part of the program.
function scope varibles are only accessible inside the function they are declared in.
block scope limits the scope of a variable to the block of code where it is declared.
block scope only works with let and const variables
JavaScript will look for a variable starting from the current scope and move outwards.
- The JavaScript engine will start looking in the scope where the variable is requested.
- If it can't find it in the current scope, it moves out one level and checks again.
- It keeps moving to the outer scope until it has reached the global scope.
- If the JavaScript engine checks all of the outer functions and global scope, and it still can't find the identifier then it will return a Reference error.
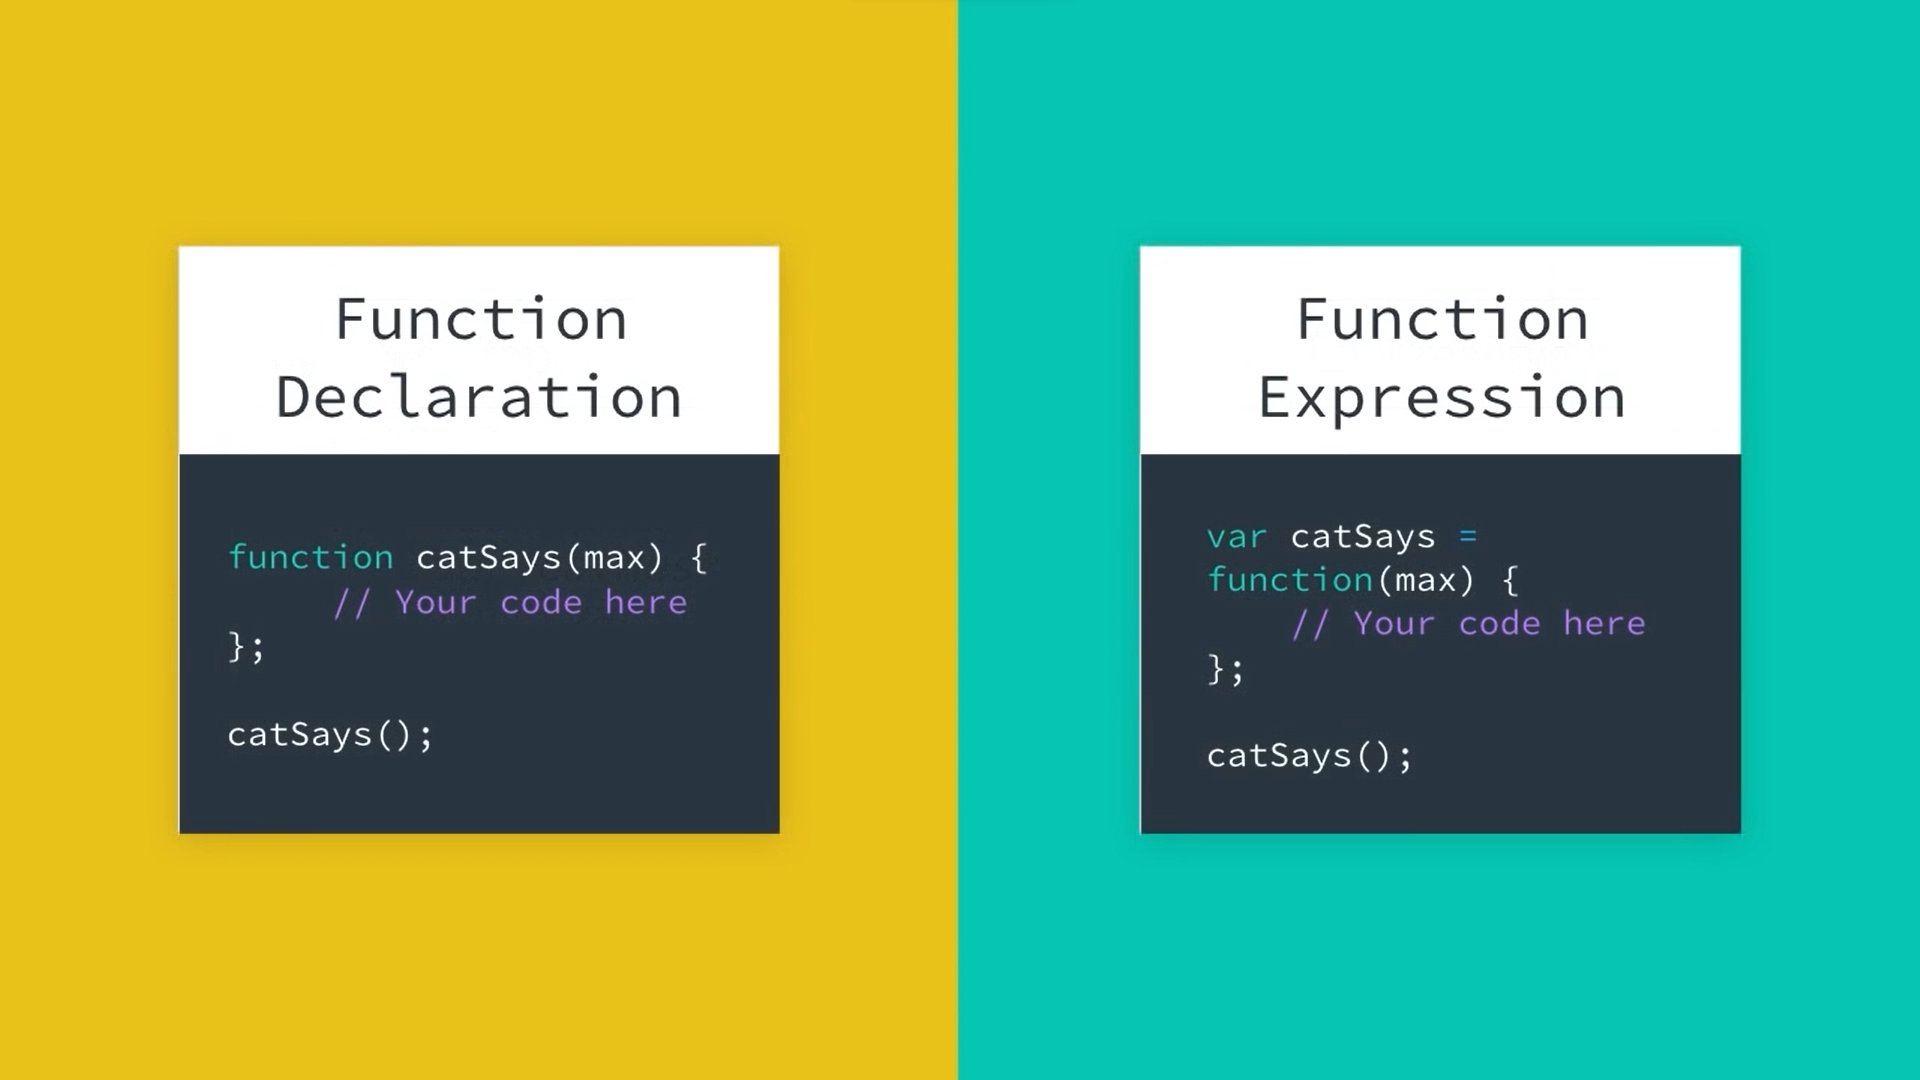
Function Expressions
A function expression is an expression declared inside a variable.
Hoisting
Hoisting is another topic that might be the cause of some errors when trying to debug. It is the result of how JavaScript is interpreted by the browser. Essentially, before any JS code is executed, all function declarations and variables with var are hoisted, or raised to the top of the function scope.
To avoid hoisting bugs, it's best practice to declare global scope functions and variables at the top of the script and function scope variables at the top of functions before needing to call it.
Function Expressions and Hoisting
Function expressions are not hoisted, since they involve variable assignment, and only variable declarations are hoisted. The function expression will not be loaded until the interpreter reaches it in the script.
Functions are fundamental to programming!
Things learned in this lession:
- Declare and run functions
- Use return statements to return items when a function runs
- Explain the difference between parameters and arguments
- Explain the difference between returning and logging
- Understand how scope works in JavaScript
- Use let and const in block scope
- Understand how hoisting works
- Store functions in variables using function expressions
- Use inline function expressions
Intro to Arrays
Arrays are data structures that can hold multiple data values. Arrays are also organized data.
To declare an array, you delcare the variable name with an opening/closing brackets
let arr = [];
To add data to the array, each element in the array must be seperated with a comma.
Arrays may store multiple types of data in a single array. Arrays may also be nested inside each other
const nestArray = [[3, 6, 11], ["March", "June", "November"], [false, true, true]];
Arrays may also be broken down on a new line after each comma. This may make it easier to read arrays or nested arrays:
const nestArray = [
[3, 6, 11],
["March", "June", "November"],
[false, true, true]
];
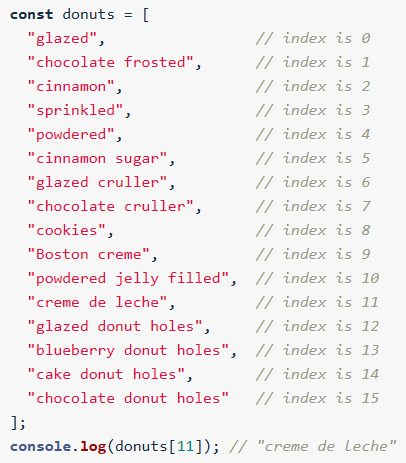
An element is one individual piece of data in the array.
Each element in the array is numbered or indexed starting with 0.
The index allows us to access the element's position in the array.
Array Indexing
If trying to access an index of an array that does not exist, an undefined value will be returned.
To change the value of an array element, you need to set it equal to a new value.
Example:
const arrCount = [0,1,2,2,4,5];
console.log(arrCount[3]);
arrCount[3] = 3;
console.log(arrCount[3]);
Why declare arrays with const instead of let
simple way to think about the difference between let and const is that we use let when we anticipate that the value of a variable will change and const when we think it will be constant -- but that shorthand doesn't tell the whole story. The difference between let and const is not so much about change but about reassignment
- let allows you to reassign the variable
- const doesn't allow you to reassign the variable
The decision about whether we need to be able to reassign the variable is based on what type of variable it is and how JavaScript stores those values.
Primitive vs Object Types in JavaScript
String, Number, Boolean, undefined and null are considered Primitive Types in JavaScript. These relatively simple data types represent just one value which makes it easy for JavaScript to store that value. So when you assign a primitive value to a variable, JavaScript actually assigns that value.
Arrays are more complicated because they consist of a list of values which makes storage much more complicated. Arrays are actually Object types which means that instead of assigning all of the values of the list to the array, JavaScript simply assigns a reference to where to find the values in the array. Even if the values inside the object change, the reference address doesn't.
Here's an analogy that might help. Think of a JavaScript array as if it were a house. The house has a group of people who live inside it. If those people move out, and a new group of people moves in, the names of the people inside the house changes, but the house's postal address won't.
TL;DR
We use const> to declare arrays because JavaScript is assigning a reference that points to that array.
We can change whatever we want inside the array, but we cannot change which array the variable points to.
Array Properties and Methods
Properties are special pieces of information about a data structure; for example, .length gets the number of characters in a string. In an array, .length gets the number of indexes.
Methods are predefined functions that a data structure can call; for example, reverse, sort, push, and pop
- REVERSE - Reverses the order of the elements in an array
- SORT - Sorts the elements in an array
- PUSH - adds elements to an array
- POP - Removes elements from an array
There are a lot of properties and methods that may be used. For a full list, click here: MDN Documentation
TIP: Type [] in the JavaScript console for a list of all available array methods
length property
adding .length to an array will find it's length.
const fruits = ["apple", "orange", "banana"];
console.log(fruits.length);
Prints: 3
The length property returns the number of elements in an array.
Tip: Strings have a .length property too. It can be used to get the length of how many characters in the string.
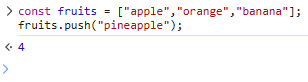
Push method
push() method adds elements to the end of an array.
Example of how to use .push():
const fruits = ["apple", "orange", "banana"];
fruits.push("pineapple");
Note: The push() method returns the length of the array after an element has been added.
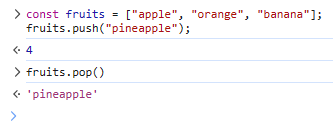
Pop method
pop() method removed the elements from the end of an array.
pop() will always remove the last elemnt form the end of the array.
Note: pop() returns the elemnt that has been removed - This may be handy if you want to do something with the element that has been removed from the array.
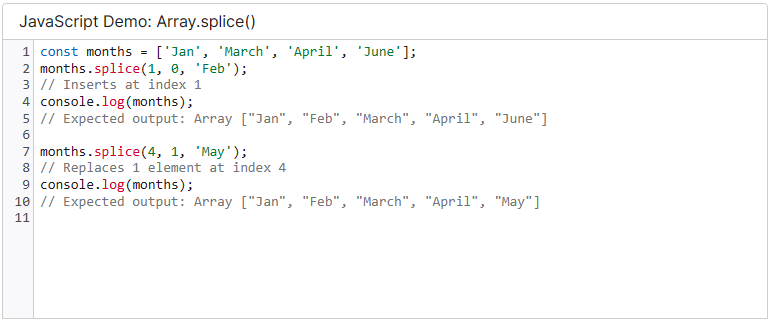
Splice method
splice() allows adding and removing elements from anywhere within an array.
Unlike push() and pop() being limited to modifying the end of an array, splice() allows us to specify the index of the array and add new elements as well as number of elements to delete (if any).
Following is the syntax of splice() method:
arrayName.splice(arg1, arg2, item1, ..., itemX);
- arg1 = Mandatory argument. Specifies the starting index position to add/remove items. You can use a negative value to specify the position from the end of the array e.g., -1 specifies the last element.
- arg2 = Optional argument. Specifies the count of elements to be removed. If set to 0, no items will be removed.
- item1, ..., itemX items to be added at index position arg1
VS Code definition
splice(start: number, deleteCount: number, ...items: T[]): T[];
Inserts new elements at the start of an array, and returns the new length of the array.
@param items Elements to insert at the start of the array.
splice() method returns the item(s) that were removed.
splice() is an incredibly powerful method that allows you to manipulate your arrays in a variety of ways.
Any combination of adding or removing elements from an array can all be done in one simple line of code.
Take a look at the MDN documentation to see a long list of example code snippets demonstrating the power of splice().
Shift method
shift() works similar to pop(), exepct shift() removes the first element from the array.
Join method
You can combine elements in an array to form a string using
Array Loops
Arrays have a set of special methods to help you iterate over and perform operations on collections of data. You can view the MDN Documentation list of Array methods, but a couple big ones to know are the forEach() and map() methods.
forEach
We could use a for loop to loop over each element in an array:
for(var i = 0; i < array.length; i++)
.forEach() method - This allows us to loop over each element in an array; or iterate over an array and manipulate each element with an inline function expression.
The function passed to the forEach() method can take up to three parameters: element, index, and array Note: these may be named whatever makes sense.
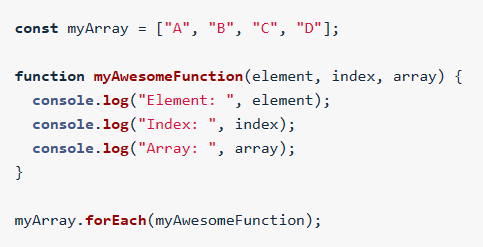
If the function will only be used once throughout the script, (using the syntax example in the image above) this can be written inline:
const myArray = ["A", "B", "C", "D"];
myArray.forEach(function(element, index, array) {
- console.log("Element: " + element);
- console.log("Index: " + index);
- console.log("Array: " + array);
});
The forEach() method iterates over the array without the need of an explicitly defined index.
The forEach() method will call this function once for each element in the array (hence the name forEach). Each time, it will call the function with different arguments. The element parameter will get the value of the array element. The index parameter will get the index of the element (starting with zero). The array parameter will get a reference to the whole array, which is handy if you want to modify the elements.
Map
for loops are very versatile and give you complete control over the looping process because you can explicitly define where to start and stop in the array,
whether you want to skip over values in the array, and whether you'd like to break out of the loop early using a break statement:
const myArray = [1,2,3,4,5];
for (let i = 0; i < myArray.length; i+= 2){
- console.log(myArray[i]);
- if (i === 2){
-- break;
- }
}
forEach gives you a concise way of looping over an array if you know you're going to be loopingover every element from start to finish.
You have less versatility than with a regular for loop, but you can access each element directly, without using an index.
const myArray = [1,2,3,4,5];
myArray.forEach(function(element)){
- console.log(element);
}
forEach() is NOT useful if wanting to permanently modify the original array. forEach() always returns undefined.
map() method can take an array, perform an operation on each element and return the new array.
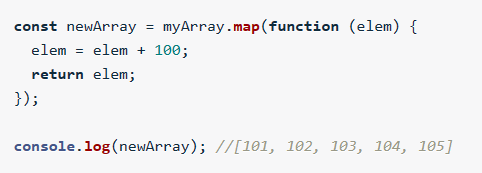
map() accepts one argument, a function that will be used to manipulate each element in the array. With map(), there is no need to iterate over the indices anymore; map() does that work for you!
Arrays in Arrays (nested arrays)
An array of arrays can be represented as grid-like structures; Each element of the array corresponds to a row of cells.
- Each row of the grid is an array
- Each of those arrays (or row) is an element of the larger array
To access each row of the grid, use a single for loop
for (let row = 0; row < grid.length; row++) {
- console.log(grid[row]);
}
To access each element in the rows, use nested for loops; a for loop inside of another for loop
for (let row = 0; row < grid.length; row++) {
- for (let cell = 0; cell < grid.length; cell++){
- - console.log(grid[row][cell]);
- }
}
The outer loop will cycle through each row that currently being iterated over;
The inner loop will iterate over each cell.
Best Practice: use intuitive variable names for variables like row and column or r and c. This will help visualize the nested array.
When writing arrays inside arrays, it is best to write them out accross multiple lines:
const nestedArray = [
["A1", "A2", "A3"],
["B1", "B2", "B3"],
["C1", "C2", "C3"]
];
Objects
Objects allow us to wrap up pieces of related data and functionality into one single container.
Ojbects in code
typeof is an operator that returns the name of the data type that follows it.
Objects are data structures in JavaScript that lets you store data about a particular thing, and helps keep track of that data by using a "key".
An object allows you to group information into a meaningful structure.
Example:
const person = {
name: "John",
age: 25,
parents: ["James", "Alice"],
pets: ["cat", "dog"],
parent: false;
};
The syntax used is object-literal notation. Things to remember when structuring an object-literal:
- The "key" (representing a property or method name) and its "value" are seperated from each other by a colon
- The key: value pairs are seperated from each other by commas
- The entire object is wrapped inside curly braces { }
To access the object's key: value, you can use one of two ways:
- person.pets - dot notation
- person["pets"] - bracket notation
Objects can also contain methods. The syntax is the same as the other key: value pairs, but the method for the object will be a function.
Example:
const person = {
name: "John",
age: 25,
parents: ["James", "Alice"],
pets: ["cat", "dog"],
parent: false;
job: function() { return "Web developer";};
};
person.job();
Naming Conventions
Best practing for naming objects:
- Don't list items with a #number as the first character of the key name
- Don't use spaces or hyphens in key names - "camelCase" should be used when using names with multiple words
- Don't use quotes around key names unless necessary. It may not cause a problem, but it can mask issues with key names