CSS Boxes and Flexbox
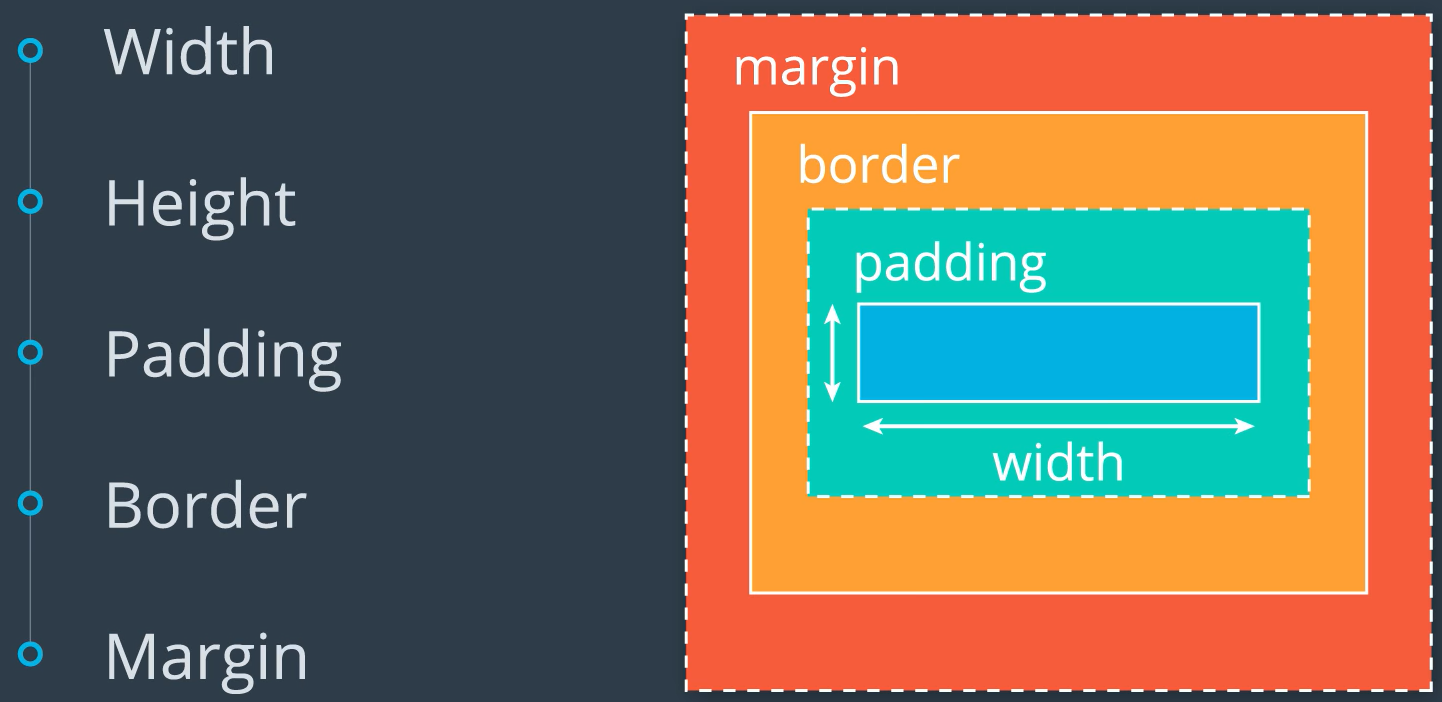
Boxes
Each "box" has a set of characteristics:
- Width
- Height
- Padding - space inside the box
- Border - space around the box
- Margin - space outside the box
Flexbox
The default layout without flexbox is top to bottom.
Example of the defualt layout below:
Adding CSS style { display: flex }, it will move the items side by side as the page has room for it.
This allows the boxes to resize, but we need to change how the boxes react to the window resizing while staying inside the div "box". To make they "wrap" to maintain their size, we can add { flex-wrap: wrap; }
We can resize the page to see how this affects the contents of the div "box".
It is important to see how the container element affects the layout of the boxes inside of it:
In the above example, each box is 100px, but the container is only 200px so the 3rd box flexes to the next line.
CSS Syntax Review
Ruleset Syntax
The basic syntax of a CSS ruleset has two parts: a selector, and a group of rules, each of which consists of a property name and the value of that property.
selector { property: value }
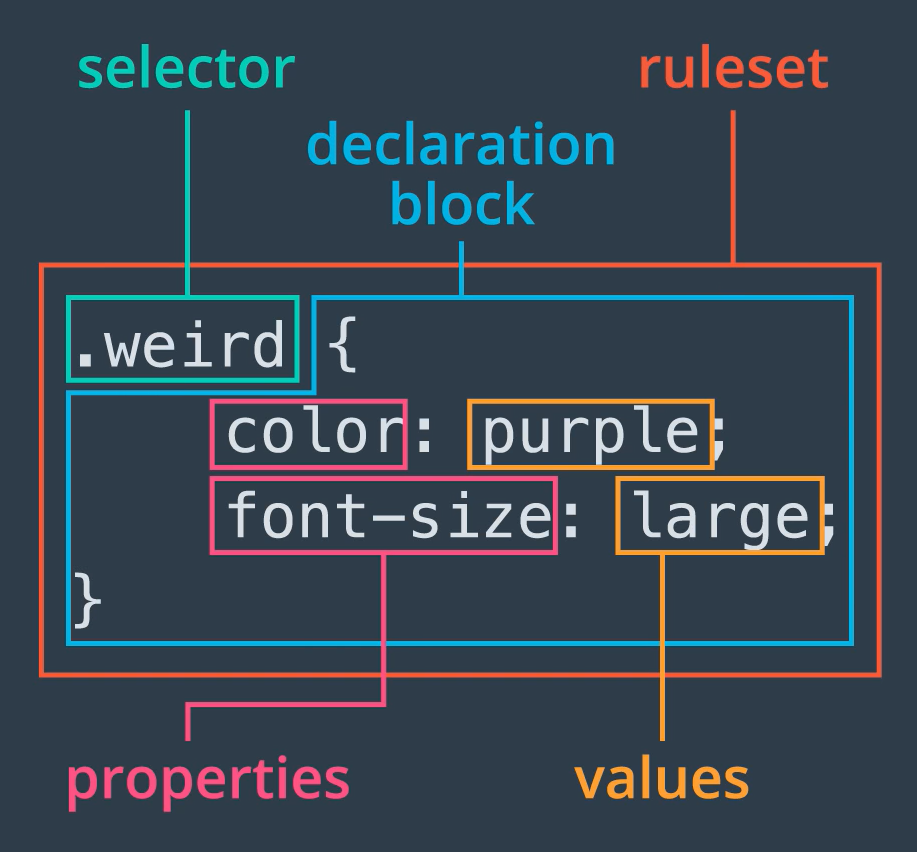
The selector is written first, and then the rules are written inside { curly brackets }. Each rule's property and value are separated by a : colon, and the rule always ends with a ; semicolon.
Selectors
The selector indicates which HTML elements the rule will apply to. You've seen a few different sorts of selector: the element selector, the class selector, the id selector, and the descendant selector.
type selector applies to every HTML element of a particular type, such as p or em. This selector will apply to every p element:
p { color: blue; }
class selector applies to all elements that share a class attribute. The class selector is written starting with a . (dot):
.narrow { width: 20% }
In order for the class selector to apply, there have to be HTML elements on the page that use that class attribute:
<div class="narrow">
id selectorapplies to an element with a particular id attribute. The id selector is written starting with a # sign:
#sidebar { background-color: lightgray; float: left; }
In an HTML page, there should be only one element with a given id attribute value:
<div id="sidebar">
descendant selector is a compound of two simpler selectors. It applies only to an inner element that is a descendant (on the DOM tree) of a particular outer element:
li a { color: pink; }
the above selector will apply to a elements only if it's inside an li element:
<li> <a href="example.com"> example </a>
Rules
A ruleset can be composed of several rules, each of which applies a particular value to a property of the selected elements. Properties are things such as the color, position, size, and shape of the element.
h1 { color: red; font-size: larger; }
This rule applies to the value red to the property color, and the value larger to the larger property font-size
Some properties allow values that are more than one word long, such as the font property:
body { font: 12pt bold Consolas, Monaco, monospace; }
Font stacks is a list of font options seperated by a , commas. The browser will use the first font in the stack that is available on the user's system. Usually the last font in the stack should be generic font name, such as serif, sans-serif, or monospace.
Colors
Colors can be identified in CSS a few ways. Three common ways to identify colors are hex code, rgb, and color names:
hex code: .orange { color: #ff9900;
rgb: .pink { color: rgb(100%,80%,80%) }
color name: chartreuse { color: chartreuse; }
Flexbox
To change the browser's layout from the default document-based layout to the flexible box layout, set display: flex on a container element (The parent element that contains the other elements inside it):
.outer { display: flex; border: 2px dotted orange;
.inner { width: 100px; border: 1px solid black; padding: 10px;
Flexbox Continued...

To use flexbox, the container needs the display property to flex.
By setting the container element to display: flex;, all elements inside become flex items. These items can be laid out in a customized way following design patterns like columns, rows, alignment, and distribution.
Property - flex-direction
.container { display: flex; flex-direction: row-reverse; }
Box 1
Box 2
Box 3
As seen above, the css flex-direction: row-reverseallowed the child elements of the container to be in a row, but it reversed the row despite being an ordered list.
Other css values for flex-direction are row, column, and column-reversed
Property - justify-content
.container { justify-content: center; }
This identifies were the content of the container should adjust to on the page.
Property - order
The .item { order: # } property allows us to change the order of specific container items regardless of where they may appear in our HTML.
Axis and Direction with Flexbox
Defined by flex-direction which has four possible values:
- row
- row-reverse
- column
- column-reverse
row and row-reverse will create the main axis horizontally or inline direction.
column and column-reverse will create the main axis vertically or block direction.
block or inline refer to the CSS display settings
Depending on which axis (vertical=row or horizontal=column) will affect how how display properties and their values are displayed on the page. You can see how this is affected below with CSS justify-content: center;.
Nothing set:
Box 1
Box 2
Box 3
Horizontal:
Box 1
Box 2
Box 3
Vertical:
Box 1
Box 2
Box 3
Ordering Elements with Flexbox
Several ways to order items in the flexbox container. A few ways are:
- row-reverse, column reverse: keyword-reverse - used on flex-direction setting
- Order of HTML code: Move the lines of code to create the order
- order CSS property: Specifically for flex items - HTML elements inside a container that has display:flex; property
Aligning Items & Justifying Content with Flexbox
-
align-items: Aligns the items on the cross axis
align-items values: - stretch
- flex-start
- flex-end
- center
-
justify-content: Aligns the items on the main axis
justify-content values: - flex-start
- flex-end
- center
- space-around
- space-between
- space-evenly
CSS Grid
Grid vs Flexbox
Grid is useful for creating the page layout
Flexbox is how the content flows on the page through the regions within the grid
To use gird, use CSS: .container { display: grid; }
The image below breaks down how CSS display grid and flexbox can work together.

- Grid is two dimensional, while flex is onedimensional
- Grid is layout first, while flexbox is content first
- Flex is for components of an app, grid is for the app's layout of each component
Rows & Columns
Rows are horizontal; above and below each other.
Columns are vertical; left and right each other.
After setting display to grid, the next step is to set the rows and columns:
-
grid-template-columns - Defines how many column (vertical) sections the page should be divided into
The values for this property are the explicit value for each column and the number of columns is defined implicitly by the number of values entered. Example:
grid-template-columns: 60px 60px 60px;
This would breate three columns 60px in size. you had two items inside your grid and didn't set their position explicitly, the first item would be placed in the first column and the second item in the second. -
grid-template-rows - Defines how many rows (horizontal) sections the page should be divided into
Follows the same logic as grid-template-columns
grid-template-rows: 160px 60px 40px
Creates three rows of their respective sizes. - grid-gap - Sets the distance between each row and column
These properties are defined in the parent container.
Grid Areas
grid-area specifies a particular area or set of rows and columns that a gird item occupies. It is applied ot the grid item itself.
Example:
.item { gird-area: 1/2/3/3;
/* row-start/column-start/row-end/column-end */ }
gid-area is shorthand for grid-row-start, grid-column-start, grid-row-end, and grid-column-end.
grid-templaye-areas
Advanced Grid
fr - fills remaining space
Size is determined by factoring in vh minus space already used and the grid-gap.
If all grid-template row or columns are aligned with 1fr, it will evenly space everything
repeat() - repeats the same thing as many times as defined
Instead of wrighting
grid-template-columns: 1fr 1fr 1fr 1fr 1fr,
repeat can be used:
grid-template-columns: repeat(5, 1fr);
minmax() - determines min and max size of rows or columns
Example: grid-auto-rows: minmax(100px, autopx);
In this example, the smallest a row can be is 100px, but it can be as large as the content of the row is.
Media Queries
Media queries with breakpoints help the webiste display correctly across multiple different screen sizes.
Example: @media(min-width:900px){ .class{}}
This means whenever a display has a width 900px or larger, it will display the .class properties under the media query.
breakpoints are the viewport width at which we want our design to change.
We can write CSS inside the media query with a set breakpoint causing the viewport width of the device's screen size to affect how the wepage is laid out. Only the CSS that we want changed can go inside the media query - the original CSS rules will still apply and only the CSS inside the media query will override any pre-exisiting rules if the breakpoints rules are met.
viewport - the area of the window in which web content can be seen. We use the dimensions of the viewport (usually the width, but sometimes the height) as the basis of our media queries.
Adding Media Queries in Code
Media queries are used to set different style rules for different devices or sized screens. We use breakpoints to set the condition of a media query. The logic is:
@media(feature:value)
Tip: It can help thorugh development of a website to start with the smallest screen width first and work the way up. Placing the media queries at the bottom of the CSS stylesheet can help prevent cascading from the media query effecting smaller screen.
You can test how a media query works by resizing the window to see how this paragraph is affected. Review the CSS to see how this wosrks.
Correct syntax for a media query:
@media(min-width: 900px) {
.class_name {
properties: values;
}
Setting multiple screen size breakpoints, you use the keyword and.
Example:
@media(min-width:600px) and (max-width:900px)
One of the most useful features of CSS grid is that you can easily nest grids inside each other to create elegant, complex layouts. To nest CSS grids simply set the display property of the container element to grid and then select the child grid item you want to make the nested grid and set the display property of that element to grid as well! The same grid rules you’ve been learning still apply! Easy as that!